B4J Tutorial [IoT] Traffic Light with Raspberry Pi

This is a simple example of a traffic light implementation using Raspberry Pi 2.

The red, yellow and green leds are connected to pins 27, 28 and 29 (see the numbering scheme: http://pi4j.com/pins/model-b-plus.html).
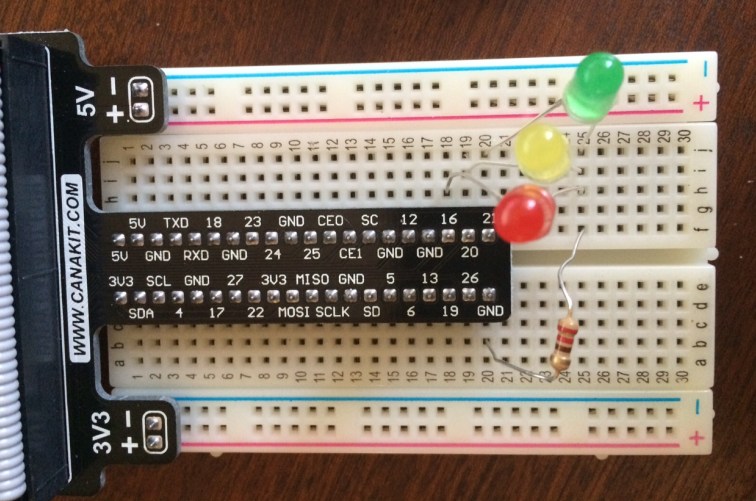
SS-2015-09-02_12.40.21.jpg


Using a timer we switch between four different states:


The complete code:
B4X:
Sub Process_Globals
   Type State (Duration As Int, Red As Boolean, Yellow As Boolean, Green As Boolean)
   Private timer1 As Timer
   Private controller As GpioController
   Private pinRed, pinYellow, pinGreen As GpioPinDigitalOutput
   Private states As List
   Private currentStateIndex As Int
End Sub

Sub AppStart (Args() As String)
   controller.Initialize
   pinRed.Initialize(27, False)
   pinYellow.Initialize(28, False)
   pinGreen.Initialize(29, False)
   states.Initialize
   states.Add(CreateState(4000, True, False, False)) 'only red
   states.Add(CreateState(2000, True, True, False)) 'red + yellow
   states.Add(CreateState(4000, False, False, True)) 'only green
   states.Add(CreateState(2000, False, True, False)) 'only yellow
   timer1.Initialize("timer1", 1000)
   timer1.Enabled = True
   currentStateIndex = -1 'it will be incremented in Timer1_Tick
   Timer1_Tick 'start with the first state
   StartMessageLoop
End Sub

Private Sub Timer1_Tick
   currentStateIndex = (currentStateIndex + 1) mod states.Size
   Dim st As State = states.Get(currentStateIndex)
   pinRed.State = st.Red
   pinYellow.State = st.Yellow
   pinGreen.State = st.Green
   timer1.Interval = st.Duration
End Sub

Private Sub CreateState(Duration As Int, Red As Boolean, Yellow As Boolean, Green As Boolean) As State
   Dim st As State
   st.Initialize
   st.Duration = Duration
   st.Red = Red
   st.Yellow = Yellow
   st.Green = Green
   Return st
End Sub

It depends on jPi4J v1.5+: https://www.b4x.com/android/forum/threads/jpi4j-raspberry-pi-gpio-controller.37493
 

sorex

Expert
Licensed User
Longtime User
interesting that you have 4 states.

In Belgium (and Holland?) it's just green, orange, red

And I believe in Luxemburg it's green, green+orange, red

so another combo than what you have there with green, orange, red, red+orange.
 

mariusz

New Member
Licensed User
Longtime User
Yes, you are right. In Poland we have also 4 states. The transitions are: red --> red+yellow --> green--> yellow --> red. Such approach allows to distinguish beetween red to green vs. green to red transitions. Additionally for pedestrians we have only red and green lights and the transitions are: red --> green --> blinking green (meaning "yellow") --> red.
 

Beja

Expert
Licensed User
Longtime User
Thanks Erel,
How the whole system is interfaced? is it connected to a computer?
 

giggetto71

Active Member
Licensed User
Longtime User
Erel,
forgive the stupid question. I am new to raspberry Pi world programming. I would like to test your trafic light example but I guess I missed something very basic. I understood you need
Pi4J library on android device side (I was able to install the library on my pc where i have the B4A ide). What I don't get is what I need on raspberry PI side. Can you help me to understand? For example in the example code I did not find any place where you set the address of the PI device. thanks for your help.
pierluigi
 

derez

Expert
Licensed User
Longtime User
I am trying to put the above two lines into a script which is run at startup (to enable running the application automatically) but it does not work.
They are required to create/provide access to the gpio_sw folder.
Does anybody know of a solution ?
 

Roycefer

Well-Known Member
Licensed User
Longtime User
If my recollection serves me, you can't call "sudo" in a script unless the script itself already has superuser privileges. That is, the script had to have been called with "sudo" if you want anything inside the script to be able to call "sudo". This makes for a chicken-and-the-egg problem if you want sudo stuff to run automatically on start up, without user intervention.
 

derez

Expert
Licensed User
Longtime User
The attached program demostrates the lights on orangepi. It includes also a button which holds the change of lights (so the user can manually give more green if needed...).
There is a small class to handle the pins.
EDIT: see two posts down for an updated class.

Have you tried it without the "sudo"?
Yes to no avail...
 

Attachments

  • gpio.zip
    1.5 KB · Views: 718
  • lights.jpg
    lights.jpg
    78.5 KB · Views: 828
Last edited:

derez

Expert
Licensed User
Longtime User
Found the solution !
The command modprobe does not run in a script, but it controls the loaded modules. in /etc/modules there is a list of the modules that load at start.
I added "gpio-sunxi" to the list of modules and gpio works without any more commands after strat.

Of course, there is a reason not to load it for use of the board which does not need gpio, so do the change only for gpio use.
 

derez

Expert
Licensed User
Longtime User
An updated GPIO class for OrangePi, including Pulse Width Modulation:
Edit: Found out that the READ setting is good only to read a previous set of state, not for real sensing a pin with voltage.
B4X:
'Class module
Sub Class_Globals
    Public WRITE As String = "1"
    Public READ As String = "0"
    Private pname As String
    Private dir As String = "/sys/class/gpio_sw/"
    Private t1,t2 As Int
    Private dt As Timer
End Sub

'Initializes the object.
'Pin string should match a sub folder of /sys/class/gpio_sw/
'Put function as WRITE for writing to and READ for reading the pin.
Public Sub Initialize(pin As String, function As String)
    pname = pin
    File.WriteString(dir & pname ,"cfg",function)
    setState(False)
End Sub

public Sub setState(pin_on As Boolean)
    If pin_on Then
        File.WriteString(dir & pname ,"data","1")
    Else
        File.WriteString(dir & pname ,"data","0")
    End If
End Sub

public Sub getState  As Boolean
    Dim st As String = File.readString(dir & pname ,"data")
    If st.CharAt(0) = "1" Then
        Return True
    Else
        Return False
    End If
End Sub

public Sub PWMOn(timeon As Int, timeoff As Int)
    t1 = timeon
    t2 = timeoff

    dt.Initialize("dt",t1)
    dt.Enabled = True
End Sub

public Sub PWMOff
    dt.Enabled = False
    setState(False)
End Sub

Private Sub dt_Tick
If dt.Interval = t1 Then
     dt.Interval = t2
    setState(False)
Else
    dt.Interval = t1
    setState(True)
End If
End Sub

Note: using short times like few milisec with debug mode doesn't produce correct results because of the debug additional time-load, but it works in release mode.
Note: PWM can be used to match the intensity of color leds.
 
Last edited:
Top