Large projects and especially projects maintained by a group of developers usually require a source control system.
Using SVN with Basic4android is quite straightforward with a client tool such as TortoiseSVN. If you are familiar with SVN then the only thing you should remember is to add the Objects folder to svn:ignore as this folder holds temporary files and builds created during compilation.
If you are completely new to SVN then I recommend you to start by reading some material about SVN. A very good tutorial is available here: Version Control with Subversion
In this tutorial we will set a local SVN server and manage a project using TortoiseSVN client.
SVN is made of two main components. The server and the clients.
The server can be installed locally or on a different computer.
VisualSVN is the recommended SVN server for windows. It is easy to manage and is free.
Download and install VisualSVN.
Download and install TortoiseSVN. This is the client (it is also free).
The installation requires restarting Windows. So be patient...
We will now add the CurrencyConverter project to SVN.
You can add a different project in a similar manner. Please backup your project before adding it.
Run VisualSVN.
Create a new repository named 'main', with the default layout.
Create a new user.
Under the trunk folder create a folder named CurrencyConverter.
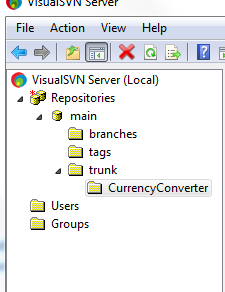
In VisualSVN right click on CurrencyConverter and choose Copy URL to clipboard.
Open Windows Explorer and navigate to your project folder.
Right click and choose SVN Checkout.
Paste the URL in the repository field.
Make sure that the checkout directory is correct and doesn't include the project name twice.
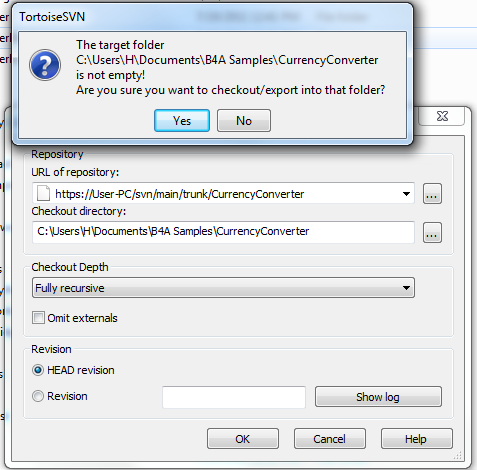
If this is the first time you connect with the local server then you will see a warning message about the certificate. Press on the Accept Permanently button.
After the checkout all the project files and folders should appear with a question mark icon as they are missing from the repository.

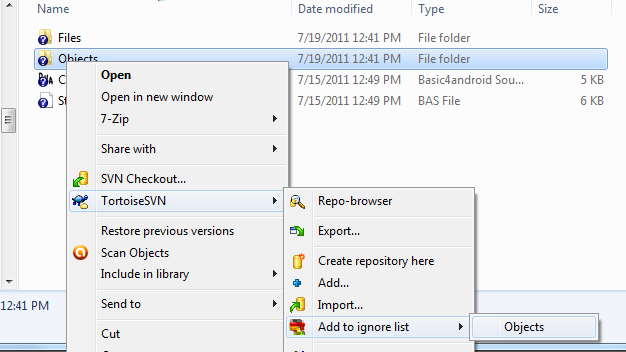
The next step is to add the Objects folder to the 'ignore' list. The Objects folder should not be controlled as it only* contains files generated during compilation (*the icon file is also stored inside. In order to keep things simple I recommend you to manage the icon manually).
Right click on Objects folder and choose Add to ignore list:
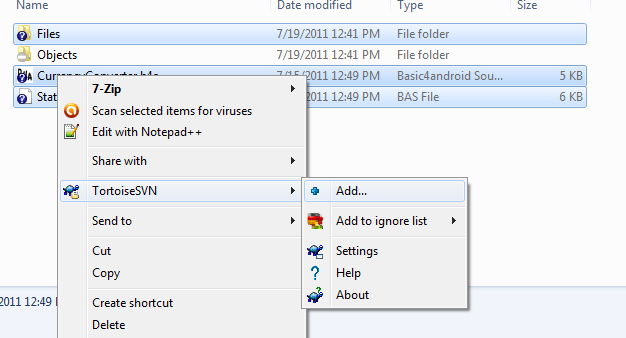
Now we should add the code files and the Files folder to SVN.
Mark these items and choose Add:
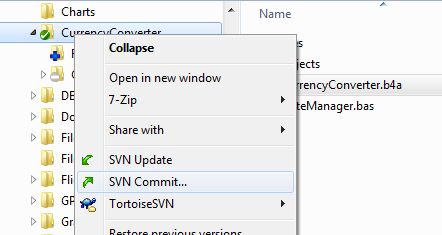
Right click on CurrencyConverter folder and choose SVN Commit to commit the changes:
The result should look like:
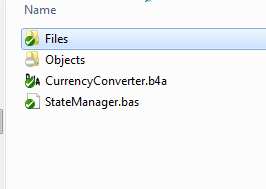
This means that the code files and Files folder are updated, and Objects is ignored.
Your project is now managed by SVN :icon_clap:
SVN is very powerful and will allow you to easily track changes and compare the current version with previous versions. It is your responsibility to commit your changes from time to time.
If users are interested with auto-committing the project every x hours then I will explain how to accomplish it with an additional script.
Using SVN with Basic4android is quite straightforward with a client tool such as TortoiseSVN. If you are familiar with SVN then the only thing you should remember is to add the Objects folder to svn:ignore as this folder holds temporary files and builds created during compilation.
If you are completely new to SVN then I recommend you to start by reading some material about SVN. A very good tutorial is available here: Version Control with Subversion
In this tutorial we will set a local SVN server and manage a project using TortoiseSVN client.
SVN is made of two main components. The server and the clients.
The server can be installed locally or on a different computer.
VisualSVN is the recommended SVN server for windows. It is easy to manage and is free.
Download and install VisualSVN.
Download and install TortoiseSVN. This is the client (it is also free).
The installation requires restarting Windows. So be patient...
We will now add the CurrencyConverter project to SVN.
You can add a different project in a similar manner. Please backup your project before adding it.
Run VisualSVN.
Create a new repository named 'main', with the default layout.
Create a new user.
Under the trunk folder create a folder named CurrencyConverter.

In VisualSVN right click on CurrencyConverter and choose Copy URL to clipboard.
Open Windows Explorer and navigate to your project folder.
Right click and choose SVN Checkout.
Paste the URL in the repository field.
Make sure that the checkout directory is correct and doesn't include the project name twice.

If this is the first time you connect with the local server then you will see a warning message about the certificate. Press on the Accept Permanently button.
After the checkout all the project files and folders should appear with a question mark icon as they are missing from the repository.

The next step is to add the Objects folder to the 'ignore' list. The Objects folder should not be controlled as it only* contains files generated during compilation (*the icon file is also stored inside. In order to keep things simple I recommend you to manage the icon manually).
Right click on Objects folder and choose Add to ignore list:

Now we should add the code files and the Files folder to SVN.
Mark these items and choose Add:

Right click on CurrencyConverter folder and choose SVN Commit to commit the changes:

The result should look like:

This means that the code files and Files folder are updated, and Objects is ignored.
Your project is now managed by SVN :icon_clap:
SVN is very powerful and will allow you to easily track changes and compare the current version with previous versions. It is your responsibility to commit your changes from time to time.
If users are interested with auto-committing the project every x hours then I will explain how to accomplish it with an additional script.

