This is an old tutorial. More powerful custom views: [B4X] Custom Views with Enhanced Designer Support
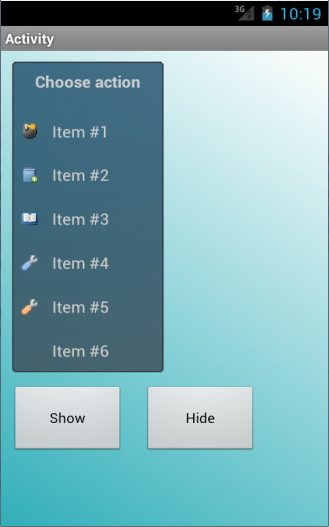
The attached project contains a code module which you can use in your projects to show a custom list which the user can choose from:

The list is manually drawn. This means that it should not be too difficult to customize it and further improve it.
There are several settings that can be changed in Sub Process_Globals:
The background is a nine-patch image. See this tutorial for more information about these images: Nine patch images tutorial
The following code demonstrates how to create and show this list:
In your activity module you should have ActionList global variable.
The following line creates a new ActionList and assigns it to the variable:
The parameters are: width, title and the activity module name (required for raising the Result event).
Adding items is done by calling:
The parameters are: ActionList variable, item text, item image (or Null) and the value that will be returned when the user clicks on this item.
This module requires the Animation library (the menu fades in and out) and Reflection library (for the nine-patch image).
As explained in the nine-patch tutorial, the nine-patch image is located in Objects\res\drawable and it must be read-only.
The code is also a good example for creating a custom view with a code module.
Credits
Background image: Android 9 patch
Example icons: famfamfam.com: Silk Icons
The attached project contains a code module which you can use in your projects to show a custom list which the user can choose from:

The list is manually drawn. This means that it should not be too difficult to customize it and further improve it.
There are several settings that can be changed in Sub Process_Globals:
B4X:
   Dim ItemHeight As Int : ItemHeight = 45dip
   Dim TextSize As Float : TextSize = 16 'NOT dip.
   Dim TextLeftPos As Int : TextLeftPos = 40dip
   Dim TextColor As Int : TextColor = Colors.LightGray
   Dim TopPadding As Int : TopPadding = 5dip
   Dim ImageWidth As Int : ImageWidth = 16dip
   Dim ImageHeight As Int : ImageHeight = 16dip
   Dim ImageLeftPos As Int : ImageLeftPos = 10dip
   Dim ImageTopPos As Int : ImageTopPos = (ItemHeight - ImageHeight) / 2
   Dim SelectionColor As Int : SelectionColor = 0xFFFF8000
The background is a nine-patch image. See this tutorial for more information about these images: Nine patch images tutorial
The following code demonstrates how to create and show this list:
B4X:
Sub Globals
   Dim al As ActionList
End Sub

Sub Activity_Create(FirstTime As Boolean)
   Activity.LoadLayout("1")
   al = ActionListModule.InitializeList(150dip, "Choose action", "Main")
   ActionListModule.AddActionItem(al, "Item #1", LoadBitmap(File.DirAssets, "bomb.png"), 1)
   ActionListModule.AddActionItem(al, "Item #2", LoadBitmap(File.DirAssets, "book_add.png"), 2)
   ActionListModule.AddActionItem(al, "Item #3", LoadBitmap(File.DirAssets, "book_open.png"), 3)
   ActionListModule.AddActionItem(al, "Item #4", LoadBitmap(File.DirAssets, "wrench.png"), 4)
   ActionListModule.AddActionItem(al, "Item #5", LoadBitmap(File.DirAssets, "wrench_orange.png"), 5)
   ActionListModule.AddActionItem(al, "Item #6", Null, 6)
End Sub

Sub ActionList_Touch (Action As Int, X As Float, Y As Float) As Boolean
   'Delegates the touch event to the code module
   ActionListModule.Touch(Sender, Action, X, Y)
   Return True
End Sub


Sub Activity_KeyPress (KeyCode As Int) As Boolean
   'Pressing the back key while the list is visible will close the list
   If KeyCode = KeyCodes.KEYCODE_BACK AND al.Visible Then
      ActionListModule.Hide(al)
      Return True
   End If
End Sub
'This sub is raised when the user presses on an item
'ReturnValue is the value assigned to the selected item
Sub ActionList_Result (ReturnValue As Object)
   Log(ReturnValue)
   ToastMessageShow("ReturnValue = " & ReturnValue, True)
End Sub

Sub btnShow_Click
   ActionListModule.Show(al, Activity, 10dip, 10dip)
End Sub
Sub btnHide_Click
   ActionListModule.Hide(al)
End SubThe following line creates a new ActionList and assigns it to the variable:
B4X:
al = ActionListModule.InitializeList(150dip, "Choose action", "Main")Adding items is done by calling:
B4X:
ActionListModule.AddActionItem(al, "Item #5", LoadBitmap(File.DirAssets, "wrench_orange.png"), 5)This module requires the Animation library (the menu fades in and out) and Reflection library (for the nine-patch image).
As explained in the nine-patch tutorial, the nine-patch image is located in Objects\res\drawable and it must be read-only.
The code is also a good example for creating a custom view with a code module.
Credits
Background image: Android 9 patch
Example icons: famfamfam.com: Silk Icons
Attachments
Last edited:


