Please first follow the installation and configuration instructions in these tutorials:
Installing Basic4android and Android SDK
Hello world - Installing Android Emulator
In this tutorial we will use the designer to create the layout. The layout includes an EditText (TextBox) and a Button.
The user needs to guess a random number. The user enters the number in the EditText view (control) and presses on the button to submit the guess.
A "toast" message will appear, indicating to the user whether the number is larger or smaller than the chosen number.
- Create a new project and save it.
- Open the designer by choosing the Designer menu.
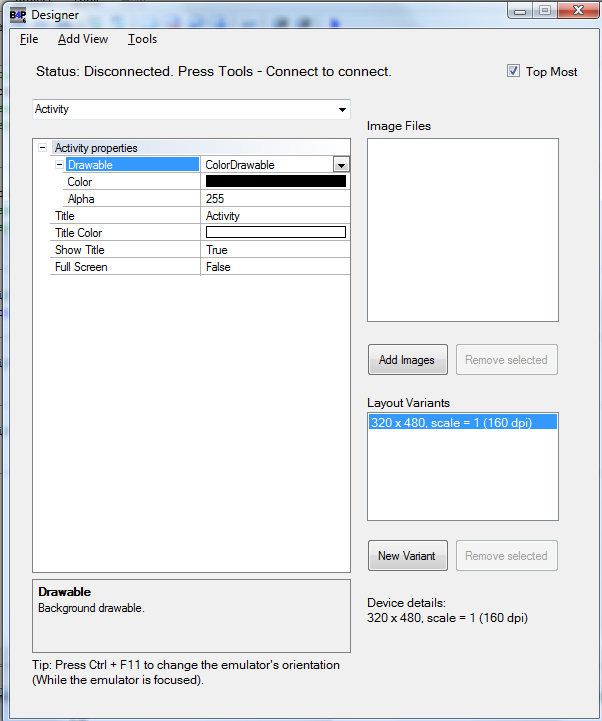
The designer is made of two main components. The "control panel" which contains all the available properties and options, and is part of the IDE:

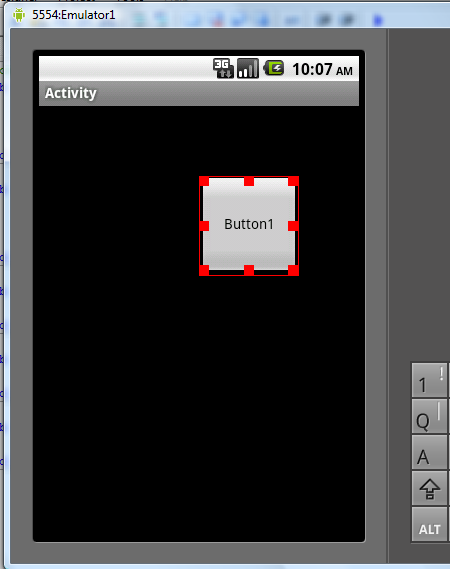
and the "visual" component which runs on a device or emulator:

The visual component, as it names suggests, displays the layout. It also allows you to move and resize the views (controls).
Changing the layout in the visual component will also change the values stored in the control panel.
Note that all the data is stored in the control panel component. Therefore nothing bad will happen if the emulator crashes or is turned off.
You can connect to it again and the layout will appear.
The first step is to connect to the device. Press Tools - Connect.
This step takes several seconds. Note that the IDE will stay connected until the IDE closes. Closing the designer will not disconnect the connection.
Use the Add View menu to add a Button, an EditText and a Label.
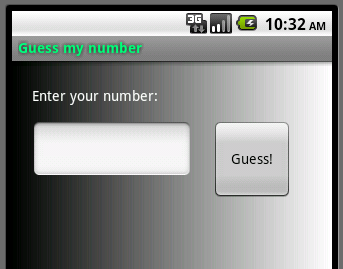
Change the views Text property and position them similar to this:

Change the Activity Drawable property to GradientDrawable to achieve the gradient effect.
Tip: When working with a small monitor you may find it convenient to check the "Top Most" option (in the upper right corner). It will cause the control panel to stay on top and not be hidden by the emulator.
Save your layout, name it Layout1.
An important concept about layouts is that there is a complete separation between your code and the layouts.
The layout is saved as a file, with ".bal" extension. Each project can have any number of such files and unless you explicitly load a layout file, it will not have any effect on your application.
Once you have saved a layout, it is automatically added to the "File manager". You can see it under the "Files" tab in the IDE right pane.
We want to catch the button's click event.
Each view has an EventName value. It is a property in the Designer, and a parameter passed to the Initialize method when adding views programmatically.
In order to catch an event you should write a Sub with the following structure (it is simpler than it sounds):
Sub <EventName>_<Event> (event parameters).
In the designer, the EventName property is set by default to the view's name.
If we want to catch the Click event of a button with EventName value of Button1 we should write the following sub signature:
Sub Button1_Click
So here is the complete code:
Some notes:
- Every activity module comes with an Activity object that you can use to access the activity.
- Activity.LoadLayout loads the layout file.
- There are other views that can load layout files. Like Panel and TabHost. For TabHost each tab page can be created by loading a layout file.
- In order to access a view that was added with the designer we need to declare it under Sub Globals.
- ToastMessageShow shows a short message that disappears after a short period.
Using a toast message in this case is not optimal as it may be unnoticed when the soft keyboard is open.
File is available here: http://www.b4x.com/android/files/tutorials/GuessMyNumber.zip
Installing Basic4android and Android SDK
Hello world - Installing Android Emulator
In this tutorial we will use the designer to create the layout. The layout includes an EditText (TextBox) and a Button.
The user needs to guess a random number. The user enters the number in the EditText view (control) and presses on the button to submit the guess.
A "toast" message will appear, indicating to the user whether the number is larger or smaller than the chosen number.
- Create a new project and save it.
- Open the designer by choosing the Designer menu.
The designer is made of two main components. The "control panel" which contains all the available properties and options, and is part of the IDE:

and the "visual" component which runs on a device or emulator:

The visual component, as it names suggests, displays the layout. It also allows you to move and resize the views (controls).
Changing the layout in the visual component will also change the values stored in the control panel.
Note that all the data is stored in the control panel component. Therefore nothing bad will happen if the emulator crashes or is turned off.
You can connect to it again and the layout will appear.
The first step is to connect to the device. Press Tools - Connect.
This step takes several seconds. Note that the IDE will stay connected until the IDE closes. Closing the designer will not disconnect the connection.
Use the Add View menu to add a Button, an EditText and a Label.
Change the views Text property and position them similar to this:

Change the Activity Drawable property to GradientDrawable to achieve the gradient effect.
Tip: When working with a small monitor you may find it convenient to check the "Top Most" option (in the upper right corner). It will cause the control panel to stay on top and not be hidden by the emulator.
Save your layout, name it Layout1.
An important concept about layouts is that there is a complete separation between your code and the layouts.
The layout is saved as a file, with ".bal" extension. Each project can have any number of such files and unless you explicitly load a layout file, it will not have any effect on your application.
Once you have saved a layout, it is automatically added to the "File manager". You can see it under the "Files" tab in the IDE right pane.
We want to catch the button's click event.
Each view has an EventName value. It is a property in the Designer, and a parameter passed to the Initialize method when adding views programmatically.
In order to catch an event you should write a Sub with the following structure (it is simpler than it sounds):
Sub <EventName>_<Event> (event parameters).
In the designer, the EventName property is set by default to the view's name.
If we want to catch the Click event of a button with EventName value of Button1 we should write the following sub signature:
Sub Button1_Click
So here is the complete code:
B4X:
Sub Process_Globals

End Sub

Sub Globals
    Dim MyNumber As Int
    Dim EditText1 As EditText 'will hold a reference to the view added by the designer
End Sub

Sub Activity_Create(FirstTime As Boolean)
    Activity.LoadLayout("Layout1") 'Load the layout file.
    MyNumber = Rnd(1, 100) 'Choose a random number between 1 to 99
End Sub

Sub Button1_Click
    If EditText1.Text > MyNumber Then
        ToastMessageShow("My number is smaller.", False)
    Else If EditText1.Text < MyNumber Then
        ToastMessageShow("My number is larger.", False)
    Else
        ToastMessageShow("Well done.", True)
    End If
    EditText1.SelectAll
End Sub- Every activity module comes with an Activity object that you can use to access the activity.
- Activity.LoadLayout loads the layout file.
- There are other views that can load layout files. Like Panel and TabHost. For TabHost each tab page can be created by loading a layout file.
- In order to access a view that was added with the designer we need to declare it under Sub Globals.
- ToastMessageShow shows a short message that disappears after a short period.
Using a toast message in this case is not optimal as it may be unnoticed when the soft keyboard is open.
File is available here: http://www.b4x.com/android/files/tutorials/GuessMyNumber.zip
