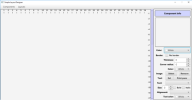
Simple Layout Designer (SLD) B4J application.
Check out message #31 for the latest update!
In this tutorial you can learn how to create a layout using the Simple Layout Designer application.


You can place labels and panes on the main pane using the components menu.
Each component can be moved to another position. When you hover over the edge or corner of the component (blue edge) then you can click and drag that edge or corner to resize the component.
The order of creating the components is important because the last created component can be placed on top of another component. Labels and panes can be placed on top of a pane or another label.
You can attach labels to a selected pane by clicking on the menu item “Attach” and detach them from the pane when you don’t need the attachment any more. Components can be removed.
The layouts can be saved or loaded. The file extension is *.sld. The content is a plain JSON text (a list of maps) and can be edited outside of the application.
To select a component you just click on it. In the Component info panel you can see and change the property settings for that component.
The main pane or another selected pane can be printed. When you use a PDF printer application then you can select the paper format (A4, A3 or A2) and the orientation (portrait or landscape). When you print on a A2 paper in portrait you get 4 A4 pages! (see the sld_doc example).
The project zip-file is attached.
When you first run the application the documentation file and its images are copied to the layoutfiles and imagefiles folders from the project folder usually under C:/Users/yourname/AppData/Roaming/simple_layout_designer/.
Replace “yourname” with your actual user name.
If you load the sld_doc.sld file in the application you will see that the images do not appear yet. Click on each label, look at the image file name in the component info panel, click on the image select button and select the correct image. After all the modifications are done then you can save the layout file and replace the old sld_doc.sld file. The next time you start the application the documentation should be complete.
Now you have a tool to be creative with layouts. If you think of any improvements that need to be made, just let me know or share your additions. It would be nice if we could work together on this application to make it even better!
And of course you can find an example on how to use the layouts you create in the attached file. Unzip the sld_load_example.zip file to test it out.
Happy coding!
Check out message #31 for the latest update!
In this tutorial you can learn how to create a layout using the Simple Layout Designer application.
You can place labels and panes on the main pane using the components menu.
Each component can be moved to another position. When you hover over the edge or corner of the component (blue edge) then you can click and drag that edge or corner to resize the component.
The order of creating the components is important because the last created component can be placed on top of another component. Labels and panes can be placed on top of a pane or another label.
You can attach labels to a selected pane by clicking on the menu item “Attach” and detach them from the pane when you don’t need the attachment any more. Components can be removed.
The layouts can be saved or loaded. The file extension is *.sld. The content is a plain JSON text (a list of maps) and can be edited outside of the application.
To select a component you just click on it. In the Component info panel you can see and change the property settings for that component.
The main pane or another selected pane can be printed. When you use a PDF printer application then you can select the paper format (A4, A3 or A2) and the orientation (portrait or landscape). When you print on a A2 paper in portrait you get 4 A4 pages! (see the sld_doc example).
The project zip-file is attached.
When you first run the application the documentation file and its images are copied to the layoutfiles and imagefiles folders from the project folder usually under C:/Users/yourname/AppData/Roaming/simple_layout_designer/.
Replace “yourname” with your actual user name.
If you load the sld_doc.sld file in the application you will see that the images do not appear yet. Click on each label, look at the image file name in the component info panel, click on the image select button and select the correct image. After all the modifications are done then you can save the layout file and replace the old sld_doc.sld file. The next time you start the application the documentation should be complete.
Now you have a tool to be creative with layouts. If you think of any improvements that need to be made, just let me know or share your additions. It would be nice if we could work together on this application to make it even better!
And of course you can find an example on how to use the layouts you create in the attached file. Unzip the sld_load_example.zip file to test it out.
Happy coding!
Attachments
Last edited:

